Tuesday, December 20, 2011

MAC Paint Pots

OKAY. So, I'm planning to engulf you all in make-up to somehow accommodate from the amount of time I've spent doing everything but blogging. Here is a look at one of my favourite products from MAC, their Paint Pots!

MAC paint pots are of a creamy consistency and are designed to be a base for all eye products. A base is absolutely essential. Whether you use a paint pot, a concealer, or just a wash of your foundation over your eye, that base will enhance any eye product dramatically.

The thing that are great about using a paint pot as a base is the fact that you can get colour involved, instead of the standard flesh tones of concealers and foundations. These products are also especially good for oily lids, as they dry matte. These paint pots have a tendency to cling onto dry skin, and if you are having this problem I would recommend applying an eye cream beforehand. MAC have a small permanent range of paint pots, all fairly natural colours to use with your everyday eye products. Usually, MAC bring out their super vibrant coloured paint pots in their seasonal collections.

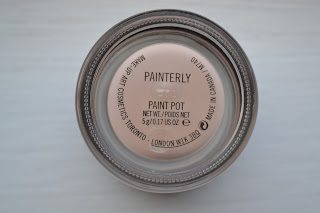
Here is a paint pot I own. so you can get a feel of the look and texture:


This is Painterly, if you watch any makeup artists online, you've probably seen them apply this before. This is MAC's bestseller as it is the most natural base for fair skin tones that they have.

Though the price is a bit steep, especially for us Australians, they are so worth it for the quality. I'll be updating with posts on different paint pots and swatches to show how effective they are! Make sure you store them on their side/upside down and screw the top on securely after every use as they can dry over time.

Price: $36
Where to Buy: Myer, David Jones, MAC stores

Saturday, December 17, 2011

OPI: Katy Perry's 'Last Friday Night' and India Collection 'Yoga Te Get This Blue!'

I love OPI. The brush almost outlines my nail completely and there's quite a lot of product inside these containers, so you get a lot of bang for your buck.

Last Friday Night


Yoga Te Get This Blue!


So the reason why I decided to do these two together rather than individually swatched is because I think the two work with each other pretty well. And due to the fact that LFN is glitter, it is designed to be worn as a top coat. So, inevitably, a blue would be most fitting :)

Keep reading for more!

Saturday, November 19, 2011

Viva Glam Gaga is back!

FINALLY THIS DAY HAS COME! MAC has brought back the first Viva Glam Gaga lipstick! For those of you who didn't purchase it before it sold out, it is a cool toned light pink colour. It's absolutely amazing!


But of course, such a great thing can't come with a catch (darn it). To purchase Viva Glam Gaga, you must buy it in a set, the set including the second installment of the Gaga lipsticks. I didn't really like Viva Glam Gaga II, it's a warm beige colour with an amplified finish. Generally I love MAC's amplified finishes but the consistency of that lipstick really didn't work for me. All together, the set totals to around $65 AUD. It also comes with a circular transparent make-up bag in red. Awesome hey?

I'll do some swatches for anyone who's interested. Just thought I'd update with some good news, laters!

Monday, November 14, 2011

MAC Mineralize Skinfinish Natural

Originally I picked up the colour 'Light', I guess just out of habit considering I'm so pale I've always been the lightest colour in any foundation range. But surprisingly, I am a medium! Yeah I don't understand it either, I guess it's better then the confusing colour codes MAC have going on.


I really love the packaging, and the dome shape the powder it comes in.  I didn't expect it to be very high coverage because it's a mineral product, and the powder is baked not pressed. But it really surpised me, the coverage is actually really good. It's so light and gives a natural look and overall glow. Also, I think this would be a good alternative for those who have dry skin, as the powder doesn't cake on like regular pressed foundation. If you're looking to buy this, definitely ask for some assistance with colour selecting!

Where to buy: MAC stores, David Jones, Myer
Price: $47
Permanent/LE: Permanent

Sunday, November 13, 2011

Body Shop Kabuki Brush

So, I said in an earlier post that I would review the new Kabuki brush I've been using. Here it is!


The texture of the brush is absolutely insane. It is so soft, and it doesn't tug at all whilst buffing or blending. Before I purchased it, the sales assistant lady told me that it is made out of 100% synthetic hair, so the hairs will almost never fall out. How's that for amazing?

The brush is so dense that I cant see make-up ever traveling to the base, so it transfers powder well without getting much left over product on the brush.

But, no great product can come without it's downfalls. It's a bit more of a struggle to pick up pressed powders with this brush, you'll find yourself swirling it in your powder compact constantly. This is definitely a brush designed for mineral foundation and loose powder. Though it transfers powder well, by not holding the product inside the brush, applying powder becomes a more time consuming job.

I use this brush everyday so it's a staple for me. I would recommend this brush to absolutely anyone! The price is a bit on the expensive side, but its one I will never have to replace.

Update! (March 2015): I still use this brush regularly, to this day not one of the hairs have fallen out even with washing and drying. It's still just as silky soft as when I purchased it!


Where to Buy: The Body Shop
Price: $34

Saturday, November 12, 2011

Halloween Make-Up

Hello! Sorry for the epic wait. I've been so busy with school work and I haven't gotten around to posting (great first impression for a beauty blogger, huh?) I'll be trying my best from now on to post at the very least once a week!

HALLOWEEN is, as they say, a make-up addicts favourite holiday. Well it was my favourite holiday before I even discovered make-up, but Halloween is definitely a lot more interesting now. I figured I'd give you the low down on my make-up for the night.

Pretty shocking hey? Unfortunately, I didn't get enough time to really work on a look. Buuut, I figure if you want to acheive this or play around with something similar,

here's the run down on what I used, obviously you can use any product you have around with the same colour scheme, or mix it up with different colours.

Revlon ColourStay Foundation
MAC Mineralise Skinfinish
MAC Painterly Paint Pot
Avon Cream Concealer
MAC Eyes shadow in Embark (Warm Dark Brown)
Revlon Lipstick in Dark Violet
NARS Single Eye shadow in Daphne (Dark Violet)
MAC Eye shadow in Carbon (Black)
Avon Lipstick in Pruni Regal
Rimmel Kohl Eye Pencil in Black
Great Lash Mascara
Red Acrylic Paint

Firstly, I started with my base. I've been using Revlon ColourStay foundation since I started using make-up so it's been a product I can't trade with anything. (lies: I am looking into Make-Up Forever's HD Foundation, everyone seems to be raving about it!) But anyway, Revlon ColourStay really works for me. Next, I used MAC's Painterly Paint Pot as a base for the eyes, I applied this all the way up the the brow bone and even on the under eyes, as the eye make-up smudges past the eyes.

Whilst this settled, I then moved onto the brows. I like to do my brows early on, though others don't.. I guess it's a matter of preference. I did my brows with MAC's eye shadow in Embark, any warm dark brown colour will do the same. I used this to also thicken the brows. I quickly dusted my face with Mineralize Skinfinish, carefully avoiding the eye area.

Finally, moving onto eyes! For this look, I used a lipstick as a base to my eye shadow. Inevitably, it creased like mad, but as it was Halloween.. the shocking the better! I applied Revlon's lipstick in Dark Violet all over my eyelid, up the the brow bone, and along my under eyes. As I wanted a thicker look and greasy look, I applied several layers. If that's not your thing, you could use any cream or liquid based product to do this. After this, I used NAR's eye shadow in Daphne, which is also a dark violet colour. As it was completely matte, and thus, a little powdery.. I applied it wet (also helped with the greasy eye look!) I went over with a tiny bit of pink cream eye shadow for more warmth. Rim the eyes with a kohl eyeliner, I just used Rimmel, and the waterline. I think I actually took this photograph before I did the waterline, that's how much of a rush I was in!

As a lip stain, I used Avon's lipstick in Pruni Regal but any dark red will do. I smudged and blended this with a synthetic brush. To add a bit of bruising, I applied Daphne mixed with Carbon on the top corner of my lip. I then quickly contoured under my cheekbones with a little of Embark and Carbon mixed together.

As for the blood, I simply watered down some red acrylic paint, and smudged. A warning if you plan to do this: it will not last very long and will most probably result you in peeling it off slowly and painfully in an hour. My advice is to use a cream product mixed with an intense red eyeshadow/pigment.

SO! there's my look. I managed to rush it in less than 15 minutes, so I'm sure if you ever do anything similar, it will be a thousand times more creative!

Over and out!

Saturday, October 22, 2011

NARS Blush 'Orgasm'


NARS ORGASM BLUSH


To mark my first make-up related post, I thought I'd give you a review on the most raved about blush on the beauty market. It is a staple in my make-up bag and their most profound product, I present to you... NARS Orgasm Blush!

NARS Orgasm is a peachy pink colour with highlights of gold shimmer. It is the most universally flattering shade I own.  It makes cheeks blush a perfect colour, and is very easy to build up to a deeper colour for a more dramatic look. Honestly,  I do not know how I went so long without this. It can be applied sheerly for a hint of colour, but with a few strokes it most definitely builds up. Generally, I apply this with a MAC 116 brush, which is my go to for most powder products.. buuuuut I've been using a Kabuki brush I recently bought from The Body Shop (will review!) which applies just as well.

The thing I've found with NARS is that the colours can look terrifying in the pan (read: Taj Mahal, an intense bright orange), but as soon as their applied to skin, they blend seamlessly. In saying that, the products are still extremely pigmented so applying with a light hand is necessary and less is definitely more. Potentially, they could all be natural, it is just a matter of pressure.

BEWARE: Although beautiful and clean upon purchase, the black rubber packaging slowly, but surely, attracts every ounce of dust, powder and make-up that falls on it. Though you can simply remove this with an eraser (seems to be the only method that works for me - and I've tried 'em all), I can't stand when my make-up is the slightest bit dirty. In my opinion, it's the price you pay for such a damn good product. If you haven't got this you should seriously investigate. Go to your local MECCA and get one of the make-up artists to apply it on you. I guarantee you will not be disappointed!

Price: $62.00
Where to buy: MECCA Cosmetica
Permanent/LE: Permanent
Rating: A solid 10/10. You can't go wrong with this blush. Ever.

Thursday, October 20, 2011

Art Class


  • never sleeping

  • spending every cent on art supplies

  • crying from perceived inability to create good art

  • never not being covered in charcoal/paint

  • somehow still having a fantastic time